Poor performance from your EV in the cold weather?
You need a BATTERY WARMING TRAY to keep your batteries at a nice temperature in the winter.
Here's how to build one.
Tuesday, October 27, 2009
Battery warmer part 1
Saturday, October 24, 2009
Homebuilt Controller testing
User JACKBAUER on ECOMODDER.COM has been busy over in Ireland working on a home-built open source controller that will run a 13" forklift motor for his BMW conversion.
This is the latest video of his.
Also, notice that he is using the car's original throttle sensor as the input source to the controller, just like Tom G did on his AC Dodge Neon. In EV conversions, it's always nice to reuse as much of the existing car parts as possible, especially if it means saving you having to purchase a new potentiometer!
For more on his project, visit his other YouTube videos or go to his comments in the Open Source Controller thread on Ecomodder.
Friday, October 23, 2009
Tesla Roadster in EV/Hybrid/Gasser Pile-up!
I found some photos of a car crash in Denmark.


A brand-new Tesla Roadster got REAR-ENDED HARD!
Also involved in the incident was a Toyota Prius, and a VW SUV.
Apparently what happened is that the Prius rear-ended the Tesla at a high-speed, forcing it right under the SUV. (The Tesla and SUV would have been stopped at the red light. You can see the traffic light to the left of the emergency worker in the one photo.)
That would explain how the SUV got on top of the Tesla, with apparently little damage to the SUV, yet you can see little bits of Tesla red under the SUV's rear bumper.
The Roadster driver walked away with minor bruises.
Notice how the cockpit space of the car is almost completely undamaged. (Except for the windshield!)
In the only other well-documented collision of an electric car that I know of, an SUV ran a red light, T-boning the EV hard. The EV simply slid sideways, the weight of the batteries keeping it flat and level on the ground, and the EV driver never lost control of the steering.
EV's are perfectly safe vehicles, but I think these photos do show how it might be a good idea for all vehicle bumpers to be the same height. I sat in a Tesla last summer. It is so low to the ground, it is rather difficult to get in and out of.
Thanks for the photos to user SKAGMAN in Flickr.
| This image has been resized. Click this bar to view the full image. The original image is sized 670x503. |
| This image has been resized. Click this bar to view the full image. The original image is sized 1024x679. |
A brand-new Tesla Roadster got REAR-ENDED HARD!
Also involved in the incident was a Toyota Prius, and a VW SUV.
Apparently what happened is that the Prius rear-ended the Tesla at a high-speed, forcing it right under the SUV. (The Tesla and SUV would have been stopped at the red light. You can see the traffic light to the left of the emergency worker in the one photo.)
That would explain how the SUV got on top of the Tesla, with apparently little damage to the SUV, yet you can see little bits of Tesla red under the SUV's rear bumper.
The Roadster driver walked away with minor bruises.
Notice how the cockpit space of the car is almost completely undamaged. (Except for the windshield!)
In the only other well-documented collision of an electric car that I know of, an SUV ran a red light, T-boning the EV hard. The EV simply slid sideways, the weight of the batteries keeping it flat and level on the ground, and the EV driver never lost control of the steering.
EV's are perfectly safe vehicles, but I think these photos do show how it might be a good idea for all vehicle bumpers to be the same height. I sat in a Tesla last summer. It is so low to the ground, it is rather difficult to get in and out of.
Thanks for the photos to user SKAGMAN in Flickr.
WINTER EV TIPS
Most hypermiles, ecomodders, and fuel-economy fans are familiar with using a block heater to improve fuel economy in a gasoline vehicle. However, drivers of electric vehicles should also know that warming your batteries in the winter can give greatly improved EV performance.
In general, my cheap-o electric car (running on used batteries) has had a range of about 20 miles in the summer, but could be as low at TEN miles in the winter!
While there is snow, increased rolling resistance, thicker transmission fluid, etc in the winter, the MAIN difference is battery temperature.
Many battery types just can't give out as much power when they are cold. A simple example of that is trying to start a gas car on a cold winter day. The starter (powered by the battery) just doesn't crank as fast and hard.
So, to keep our cold-climate EVs in top notch performance for the winter, here's a few things to try:
USE YOUR GARAGE:
If you have a garage, use it! Even though my garage is not attached to the house, isn't heated or insulated, it still keeps the wind, rain, and snow off the car. What little heat is in the car gets retained a bit better. If you have a heated garage, that's probably the ultimate way to get better winter EV performance.
OTHER SHELTER:
If you don't have a garage, at least try to park out of wind, perhaps next to a tree, which in real-world testing have been shown to act as heat storage and help prevent frost formation on the car's windows. (But watch out for pine sap!)
INSULATE YOUR BATTERIES:
Batteries will be much happier if they are wrapped in a cozy blanket. If batteries are exposed to the outside world (such as under the hood) heat can also be lost to wind. Any insulation should be water-resistant and non-conductive - using foil-faced foam is a bad idea - but using pink builder's foam works great.
WARM YOUR BATTERIES:
Find some way to get a little heat into your batteries. The best way is with something in direct contact with the batteries, either under them, or on the sides. It will need to have some sort of automatic temperature control, to prevent overheating.
Waterbed mattress heaters, electric blankets, and water-pipe freeze prevention tape all have automatic temperature controls, and can easily be repurposed to warm batteries. Make sure to not set batteries directly on heating elements. Many heaters can be easily wrecked that way.
IF YOU ARE HAPPY, YOUR BATTERIES ARE HAPPY:
While I don't mind wearing a heavy coat, hat, and gloves in the winter, it is nice to be just a bit cozier than that in my car. Last winter, I experimented with an oil-filled electric radiator space heater. I simply put it in the car (behind the passenger seat) and ran an extension cord out the window. That was plugged into a timer going to the wall. The heater came on automatically in the morning, and heated the inside of the car for about 45 minutes before I left for work. I would unplug the heater, and drive off. The heater would stay warm for about 10 minutes after that. (In my gas car, it takes 10 minutes for the engine to warm up in the winter!)
The unexpected side effect of warming the inside of the car, was that it also warmed the batteries! By trying to make myself more comfortable, I also improved the range of my battery pack!
CHARGING = HEAT:
Another trick is based on the fact that running electricity through the batteries (either discharging OR charging) warms the batteries.
Set the car's charger up on a timer so that the charge is just finishing up when you will next use the car. The batteries will be a little warmer than they would be if they simply sat charged all night. Also, opportunity charge any chance you get. Even short charges can increase your range more from the heat than from the electricity to the batteries.
I hope these tips help keep your car happy and healthy this winter! If you have any other winter electric car tips, please post them below!
Tuesday, October 20, 2009
EV Motorcycle Slideshow
While digging through some old files, I ran across a slideshow I made from stills of converting a Kawasaki KZ440 clunker to an electric motorcycle.
Enjoy
The Metro at 108 Volts!
The one thing limiting my upgrade to a higher than 72V system has been the charger. Specifically a little tiny resistor to change the output voltage of the charger.
At the last EV Build Day, I picked up a couple resistors, which rigged in series to each other, should get me the right resistance for the charger.
(Since then a friend of mine has also put in an order to a large electronics dealer, and I got in on his order for a set of resistors for the charger.)
This morning, I was able to upgrade the resistor, and I added three more batteries to the back of the car.
Of course, this takes up my trunk space, and I did love how "Normal" the car looked with just the rear battery box.

Now at 108V, my 0-100V analog voltmeter is pretty much useless.

I took the car out to run an errand, and test its performance.
I went up the BIG hill in my area, and the car seemed to zip right up it. Overall speed performance didn't seem like it was that much greater.
Coming back home, I was surprised that I couldn't get the car over 55 mph. It took me a while to figure out that it was because I was only in third gear! I needed to upshift to increase amps and speed. After that, I got the car just past 60, but by that time my pack was really getting run down and I had to get off the freeway.

A while back, I upgraded the rear springs of the car to some off the front of a Ford Ranger. These springs were really designed for holding 144V of batteries, which I HAVEN'T been running since then, so the back of the car has been riding high.
With three more batteries in back, the height of the back of the car seems to level out.

I am also trying to figure out the best way to keep my batteries warm this winter. Since I only have one traction battery under the hood right now, I might move it to the back of the car, just so all the batteries stay the same temperature. This would also drop the back of the car just enough to level it out.
The car is now charging in my driveway, but I am sure I will have to top off a few of the batteries with an individual charger to get them all even.
At the last EV Build Day, I picked up a couple resistors, which rigged in series to each other, should get me the right resistance for the charger.
(Since then a friend of mine has also put in an order to a large electronics dealer, and I got in on his order for a set of resistors for the charger.)
This morning, I was able to upgrade the resistor, and I added three more batteries to the back of the car.
Of course, this takes up my trunk space, and I did love how "Normal" the car looked with just the rear battery box.
Now at 108V, my 0-100V analog voltmeter is pretty much useless.
| This image has been resized. Click this bar to view the full image. The original image is sized 1024x680. |
I took the car out to run an errand, and test its performance.
I went up the BIG hill in my area, and the car seemed to zip right up it. Overall speed performance didn't seem like it was that much greater.
Coming back home, I was surprised that I couldn't get the car over 55 mph. It took me a while to figure out that it was because I was only in third gear! I needed to upshift to increase amps and speed. After that, I got the car just past 60, but by that time my pack was really getting run down and I had to get off the freeway.
| This image has been resized. Click this bar to view the full image. The original image is sized 1024x680. |
A while back, I upgraded the rear springs of the car to some off the front of a Ford Ranger. These springs were really designed for holding 144V of batteries, which I HAVEN'T been running since then, so the back of the car has been riding high.
With three more batteries in back, the height of the back of the car seems to level out.
I am also trying to figure out the best way to keep my batteries warm this winter. Since I only have one traction battery under the hood right now, I might move it to the back of the car, just so all the batteries stay the same temperature. This would also drop the back of the car just enough to level it out.
The car is now charging in my driveway, but I am sure I will have to top off a few of the batteries with an individual charger to get them all even.
Sunday, October 18, 2009
Cycles and Winterizing
Sunday was another EV Build Day of the Milwaukee Electric Car Club.
It turned out that we had great weather. Sunny, and about as warm as can be expected for October in Wisconsin.
Of course, it also means that some of us are thinking about what we need to do for our EVs for the winter.
I have already noticed my battery voltage dropping extra quick in my homebuilt Electric Geo Metro. Lead-Acid batteries just don't like being cold, as most drivers have noticed trying to crank their starters in the winter.
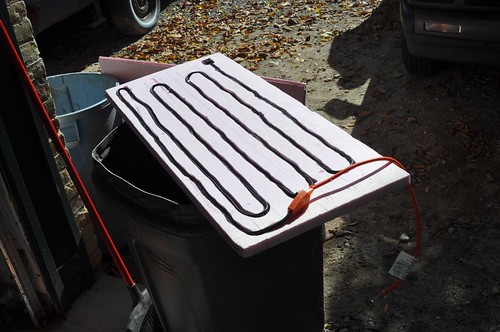
So, I spent a little time with a few parts I had kicking around from the home improvement store. I measured my battery box, and cut a one-inch-thick chunk of pink foam insulation to that size. Then I used a router to carve a serpentine path in the foam, so that I could push heat tape down into it. This is a product used to wrap pipes that could otherwise freeze, or put on the edge of your roof to keep ice from forming. It has a thermostat built right in to it.
One of our other members was also working on trying to add some insulation to the batteries in his electric S-10 pickup truck. Unfortunately, there wasn't much room between the batteries and supports to squeeze insulation in there, so he went on to work on his Pak-Trakker instead.
The real fun of the day was working on Chris' motorcycle.
Already, the motor is mounted in with a custom Mr. Speed adapter to the driveshaft of the cycle. That's right! It's a shaft cycle! You don't see too many of those in the EV flavor!
Todays work was figuring where to put the batteries. Because the frame itself is fairly large, it sure makes the job of battery location easier. Still, it's never easy to fit big square batteries into curved spaces. Chris and Rich welded in the first battery tray directly next to motor. Another battery could fit in FRONT of the motor, but only if it were turned and stuck out a bit funny.
Instead, we used a bottle jack to spread the front down tubes just a tad, so the battery would fit cross-wise. Then the second battery tray was trimmed to fit (Chris with the grinder again!) so it could be welded in place.
The cycle has been a really fun project to work on, with pretty much all the parts donated, and all of us doing what we can, when we can. I can't wait until we work on the body for the cycle. I'm sure it will get pretty crazy with LED back-lighting and interesting shapes.
Wednesday, October 14, 2009
4x4 Gasoline-Hydraulic-Electric-Hybrid Torque Beast!
This is no joke!
But I am not talking about a car - rather, a riding lawn mower.
It all started because of my upcoming Annual Bonfire.
I hold a bonfire every year, as an excuse to meet up with old friends, and clear out brush and wood not useful for my wood stove.
The event is at my parent's property, which is large and wooded, with a big back area for the bonfire.
Also, my Dad runs a remodeling business, which is housed just down the street, so I usually grab extra wood out of the dumpster from down there. This year, one of the construction cargo trailers was filled with an entire torn-out cedar picket fence.
The idea was to pull the trailer already loaded up with all that cedar, from the shop over to the house, and then use the lawn tractor there to pull the trailer into the wayback, and unload it all for the bonfire.
It SEEMED like a good plan.
The problem is that it has been cloudy and rainy for the last two weeks solid, the ground has really softened up. The trailer is a BIG and HEAVY trailer and the jack is welded in place, it doesn't swing up.
I tried pulling the trailer across the lawn, but any time I got going even SLIGHTLY uphill, the tires would just start to slip on the grass.
I would back up just a little, to get a better running start, but every time I tried that the tires would just slip again, and I would end up further back than I started!
When I finally ended up in the lowest point of the side-yard, I decided it was time to give up. I unloaded most of the wood to the ground, and was then able to pull the trailer out to the road, up the driveway, and then into the back property.
It's a big hill going into the back. It's DOWNHILL out there, but UPHILL coming back. I thought that would be OK, because the trailer would be empty for the trip back.
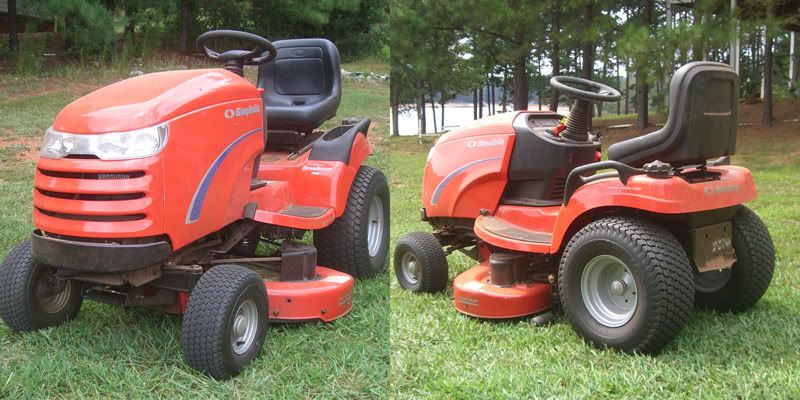
Keep in mind that my father's lawn tractor is a Simplicity V-Twin with a Hydro-transmission. It is very powerful and has an variable speed transmission. However, I was NOT able to pull the trailer back up the hill with that gas tractor. It wasn't really a matter of power, more about where you put that power. The trailer is tail-heavy, and when not loaded, actually pulls UP just a bit on the ball hitch, instead of adding tongue-weight to press the tractor tires into the ground.
I just didn't have enough weight on the ball, and wide enough tires. The tires would just spin, no matter what angle I tried to tackle the hill at.
Of course, I couldn't just hop off and help push, because the tractor has a kill switch in the seat. Believe me, I TRIED to hold down the seat and push the tractor at the same time, it just really doesn't work.
[Similar tractor to my father's 16 HP V-Twin with Hydrostatic drive]
By this time, it was getting toward the end of the day, getting dark, and threatening rain. I had to get home, so I ended up un-hitching the tractor, parking that in the garage, and left the wood in the side-yard, and the trailer in the wayback.
I figured that maybe I could come back the next day bringing my Electrak ELECTRIC riding lawn mower. The tires are wider (and half-flat to boot!) and it's tough to get more torque than you can with an electric.

[My 30-some year old electric riding lawn mower with 1/2HP drive motor]
Soooo, today, I put MY tractor on my beater utility trailer (thanks Mr. Speed!) and drove over to my parent's house. I unloaded the tractor from the trailer, then hooked the trailer to the tractor, and in two runs had all the wood moved from the side-yard to the wayback.
The Electrak handled the big hill with no problems while towing my trailer back up it.
My Dad happened to be about while I was loading up the second load of wood. I explained to him about the night before how the gas tractor couldn't pull the empty trailer back up the big hill, and how I brought my tractor out to finish the job. He said something like "Aw, you just brought it out so later you could brag to your friends how your electric one works better than my gas one."
Um, yeah, I think he pegged me there.
Now that I actually moved all the firewood, the next job was to show off how great my Electrak worked by towing the construction trailer up the big hill.
I rode out back and went to hook up the trailer. That's when I remembered that the ball hitch on my tractor is really low. And the trailer isn't. The jack does NOT swing away, it can only be cranked up so far. I was actually able to hitch it up, but at the first little bump the trailer jack just dug into the ground.
Hmmm. So, that's not going to work. If only there was some way to skid the trailer jack OVER the ground. I grabbed a plastic sled from the garage and put that UNDER the jack. Instead of hitching the trailer to the ball hitch, I just hooked the safety chains to the ball instead. That way, the trailer could be up higher and NOT dig into the earth.
This actually worked. I started climbing the hill, and quickly got past the dug-in tire mark of last night's work with the gas tractor.
Still, it wasn't much further until the bad tail-weight of the tractor, and the increasing steepness of the hill meant that the Electrak's tires were now slipping as well.
Grrrrrr. Frustration.
I backed down the hill. I tried a couple other things, even hooking the BACK of the trailer to the tractor. None of them worked.
Oh, did I mention it was now raining? Not a downpour, but 40 degree rain is never fun, especially when you already have turf trouble.
So, my problem was that the tractor hitched up great to the gas tractor, but that didn't have enough traction, and the tractor wouldn't hook up decent at all to the Electrak, which had MUCH better traction, but still ended up slipping, just further up the hill.
If only I had four-wheel drive.
It occurred to me that not all four wheels had to be on the same vehicle.
One of the many little things I still need to fix on the Electrak is the seat safety switch. Since it doesn't work, it was simply bypassed, which simply means that if you fall off the tractor, it keeps driving without you.
That's also an advantage, because I now had at hand two tractors, but only one me.
I grabbed my tow rope and and moved both tractors to the trailer.
You can see where this is going, right?
I parked the Electrak just a bit up the hill, and hooked the tow rope to the ball hitch. I hooked the other end to the front bumper of the gas tractor. And hooked the trailer to the back of the gas tractor.
I now had an Electric-tow-rope-gasoline-hydraulic four wheel drive torque beast!
I put the Electrak in first gear - which is REDICULOUSLY slow - and then hopped on the gas rider and eased the hydro into its slowest speed. Because it's variable speed, I could speed up or slow down by tiny amounts to match the speed of the Electrak, mindlessly crawling away ahead of me, and keep tension on the tow rope.
Once or twice the wheels of one tractor or the other would start to slip, but all I had to do was speed up a tad to ease up on the Electrak, or slow down a bit and let the Electrak pull the gasser when its wheels were slipping.
I can't believe this actually worked.
I think it was like a Saturday Morning special.
I was all high big-headed thinking that my electric mower would out-torque the gasser and I could brag about it.
In the end, only by gasoline and electric getting along, could we all work together to get the job done.
Go Team Hybrid!
Maybe next year, I will go back to the old-fashioned way: stuffing firewood into the back of an electric car!

But I am not talking about a car - rather, a riding lawn mower.
It all started because of my upcoming Annual Bonfire.
I hold a bonfire every year, as an excuse to meet up with old friends, and clear out brush and wood not useful for my wood stove.
The event is at my parent's property, which is large and wooded, with a big back area for the bonfire.
Also, my Dad runs a remodeling business, which is housed just down the street, so I usually grab extra wood out of the dumpster from down there. This year, one of the construction cargo trailers was filled with an entire torn-out cedar picket fence.
The idea was to pull the trailer already loaded up with all that cedar, from the shop over to the house, and then use the lawn tractor there to pull the trailer into the wayback, and unload it all for the bonfire.
It SEEMED like a good plan.
The problem is that it has been cloudy and rainy for the last two weeks solid, the ground has really softened up. The trailer is a BIG and HEAVY trailer and the jack is welded in place, it doesn't swing up.
I tried pulling the trailer across the lawn, but any time I got going even SLIGHTLY uphill, the tires would just start to slip on the grass.
I would back up just a little, to get a better running start, but every time I tried that the tires would just slip again, and I would end up further back than I started!
When I finally ended up in the lowest point of the side-yard, I decided it was time to give up. I unloaded most of the wood to the ground, and was then able to pull the trailer out to the road, up the driveway, and then into the back property.
It's a big hill going into the back. It's DOWNHILL out there, but UPHILL coming back. I thought that would be OK, because the trailer would be empty for the trip back.
Keep in mind that my father's lawn tractor is a Simplicity V-Twin with a Hydro-transmission. It is very powerful and has an variable speed transmission. However, I was NOT able to pull the trailer back up the hill with that gas tractor. It wasn't really a matter of power, more about where you put that power. The trailer is tail-heavy, and when not loaded, actually pulls UP just a bit on the ball hitch, instead of adding tongue-weight to press the tractor tires into the ground.
I just didn't have enough weight on the ball, and wide enough tires. The tires would just spin, no matter what angle I tried to tackle the hill at.
Of course, I couldn't just hop off and help push, because the tractor has a kill switch in the seat. Believe me, I TRIED to hold down the seat and push the tractor at the same time, it just really doesn't work.
| This image has been resized. Click this bar to view the full image. The original image is sized 800x400. |
[Similar tractor to my father's 16 HP V-Twin with Hydrostatic drive]
By this time, it was getting toward the end of the day, getting dark, and threatening rain. I had to get home, so I ended up un-hitching the tractor, parking that in the garage, and left the wood in the side-yard, and the trailer in the wayback.
I figured that maybe I could come back the next day bringing my Electrak ELECTRIC riding lawn mower. The tires are wider (and half-flat to boot!) and it's tough to get more torque than you can with an electric.
| This image has been resized. Click this bar to view the full image. The original image is sized 1023x680. |
[My 30-some year old electric riding lawn mower with 1/2HP drive motor]
Soooo, today, I put MY tractor on my beater utility trailer (thanks Mr. Speed!) and drove over to my parent's house. I unloaded the tractor from the trailer, then hooked the trailer to the tractor, and in two runs had all the wood moved from the side-yard to the wayback.
The Electrak handled the big hill with no problems while towing my trailer back up it.
My Dad happened to be about while I was loading up the second load of wood. I explained to him about the night before how the gas tractor couldn't pull the empty trailer back up the big hill, and how I brought my tractor out to finish the job. He said something like "Aw, you just brought it out so later you could brag to your friends how your electric one works better than my gas one."
Um, yeah, I think he pegged me there.
Now that I actually moved all the firewood, the next job was to show off how great my Electrak worked by towing the construction trailer up the big hill.
I rode out back and went to hook up the trailer. That's when I remembered that the ball hitch on my tractor is really low. And the trailer isn't. The jack does NOT swing away, it can only be cranked up so far. I was actually able to hitch it up, but at the first little bump the trailer jack just dug into the ground.
Hmmm. So, that's not going to work. If only there was some way to skid the trailer jack OVER the ground. I grabbed a plastic sled from the garage and put that UNDER the jack. Instead of hitching the trailer to the ball hitch, I just hooked the safety chains to the ball instead. That way, the trailer could be up higher and NOT dig into the earth.
This actually worked. I started climbing the hill, and quickly got past the dug-in tire mark of last night's work with the gas tractor.
Still, it wasn't much further until the bad tail-weight of the tractor, and the increasing steepness of the hill meant that the Electrak's tires were now slipping as well.
Grrrrrr. Frustration.
I backed down the hill. I tried a couple other things, even hooking the BACK of the trailer to the tractor. None of them worked.
Oh, did I mention it was now raining? Not a downpour, but 40 degree rain is never fun, especially when you already have turf trouble.
So, my problem was that the tractor hitched up great to the gas tractor, but that didn't have enough traction, and the tractor wouldn't hook up decent at all to the Electrak, which had MUCH better traction, but still ended up slipping, just further up the hill.
If only I had four-wheel drive.
It occurred to me that not all four wheels had to be on the same vehicle.
One of the many little things I still need to fix on the Electrak is the seat safety switch. Since it doesn't work, it was simply bypassed, which simply means that if you fall off the tractor, it keeps driving without you.
That's also an advantage, because I now had at hand two tractors, but only one me.
I grabbed my tow rope and and moved both tractors to the trailer.
You can see where this is going, right?
I parked the Electrak just a bit up the hill, and hooked the tow rope to the ball hitch. I hooked the other end to the front bumper of the gas tractor. And hooked the trailer to the back of the gas tractor.
I now had an Electric-tow-rope-gasoline-hydraulic four wheel drive torque beast!
I put the Electrak in first gear - which is REDICULOUSLY slow - and then hopped on the gas rider and eased the hydro into its slowest speed. Because it's variable speed, I could speed up or slow down by tiny amounts to match the speed of the Electrak, mindlessly crawling away ahead of me, and keep tension on the tow rope.
Once or twice the wheels of one tractor or the other would start to slip, but all I had to do was speed up a tad to ease up on the Electrak, or slow down a bit and let the Electrak pull the gasser when its wheels were slipping.
I can't believe this actually worked.
I think it was like a Saturday Morning special.
I was all high big-headed thinking that my electric mower would out-torque the gasser and I could brag about it.
In the end, only by gasoline and electric getting along, could we all work together to get the job done.
Go Team Hybrid!
Maybe next year, I will go back to the old-fashioned way: stuffing firewood into the back of an electric car!
Sunday, October 11, 2009
THE SPARKSTER! Homebuilt EV Motorcycle.
A while back, I gave some advice to Mike, on how to rig up his electric motorcycle project.
He decided to build an electric motorcycle after seeing what I had done.
(The Sparkster, (foreground) and the inspiration for it, my EV KZ440. (background))
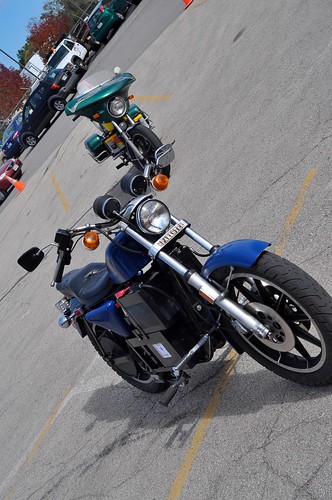
Today, I was rounding up EVs to show off at a local energy fair, and E-Bike Mike showed up with his converted Harley Sportster, the "Sparkster".
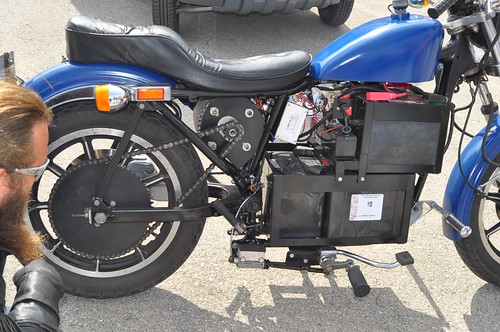
The cycle is running at 60V with an Alltrax AXE controller (72V max), and off-board charging. Mike has a motorcycle buddy who is good with the welder and paint sprayer, so the finish on the bike it top notch!
The chain noise is a little louder than on my cycle, but the chain is about twice as big as well!
I had never ridden a hard-tail before (ouch!), but other than that, it rides really well, with a real low center of gravity and good acceleration.
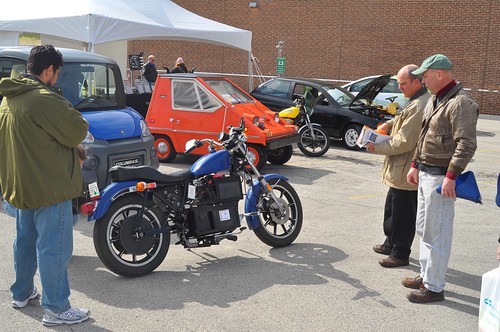
(Mike, far right, green cap, shows off his cycle.)
See all the photos at:
http://www.flickr.com/photos/4203459...7622565028224/
PS - I also just realized why the cycle is a hard-tail. Look where the motor is mounted. It's directly under the seat. As the real swing arm would move, it would change the chain length. One way to solve the problem is to hard-mount the rear wheel. By having the motor right under the seat, it frees up space for more batteries in the original engine area of the cycle. This means more batteries and a lower center of gravity.
Friday, October 9, 2009
Subscribe to:
Comments (Atom)

